How to prepare your graphics for DVD and CD printing
Step by step guidelines on preparing your designs and artworks
This tutorial has been written using Adobe Photoshop. The same principles can be applied to all other design programs for preparing your artwork for submission.
The guide that follows explains how to prepare your graphics so that they are ready for going into print. The below example uses the 4 page booklet, but the same concepts can be used for any of the templates.
Choose the correct template to save from the design templates page
1. Download the correct template
From the list of templates found on the design templates page, identify and download the correct template to your computer.
You can download the template by right-clicking on the appropriate template and selecting “save target as…”, or “save link as…”.
For this example, we’ll be using the CD booklet template.
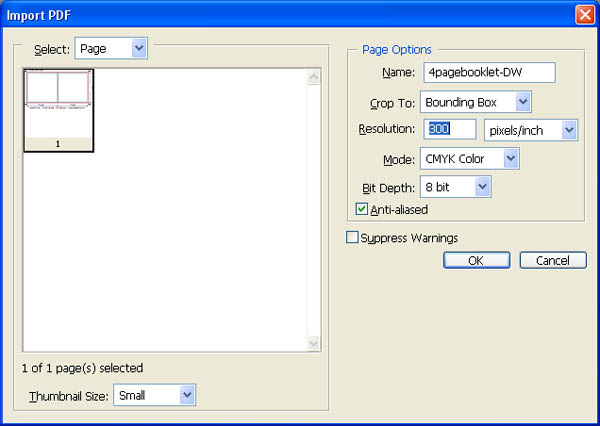
2. Open the template in Photoshop
When you open the template in Photoshop, you’ll be presented with a dialog window to set how the PDF template opens.
Use the settings shown on the left when opening any of the templates. The most important thing is to make sure the resolution is set at 300dpi, and that the colour scheme is CMYK.
Opening the PDF with the correct settings and options Layers window showing the template as the topmost layer
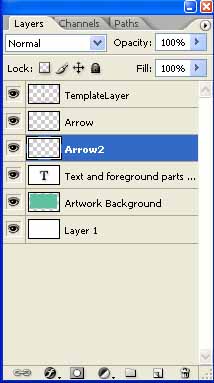
3a. Set your layers
Once the template is open you can begin to layout the graphics of your design.
It’s a good idea to keep the template as the topmost layer, so that you can see the outlines of the template when positioning your images and text.
3b. Layout your graphics
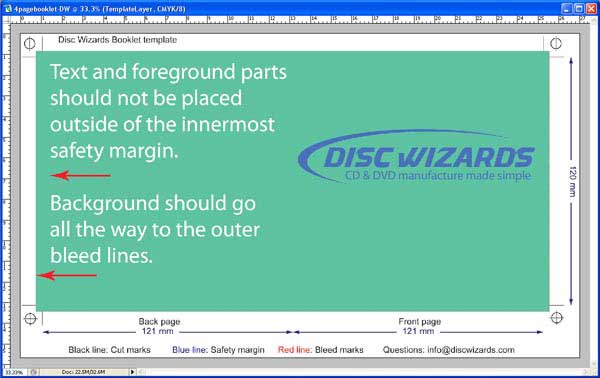
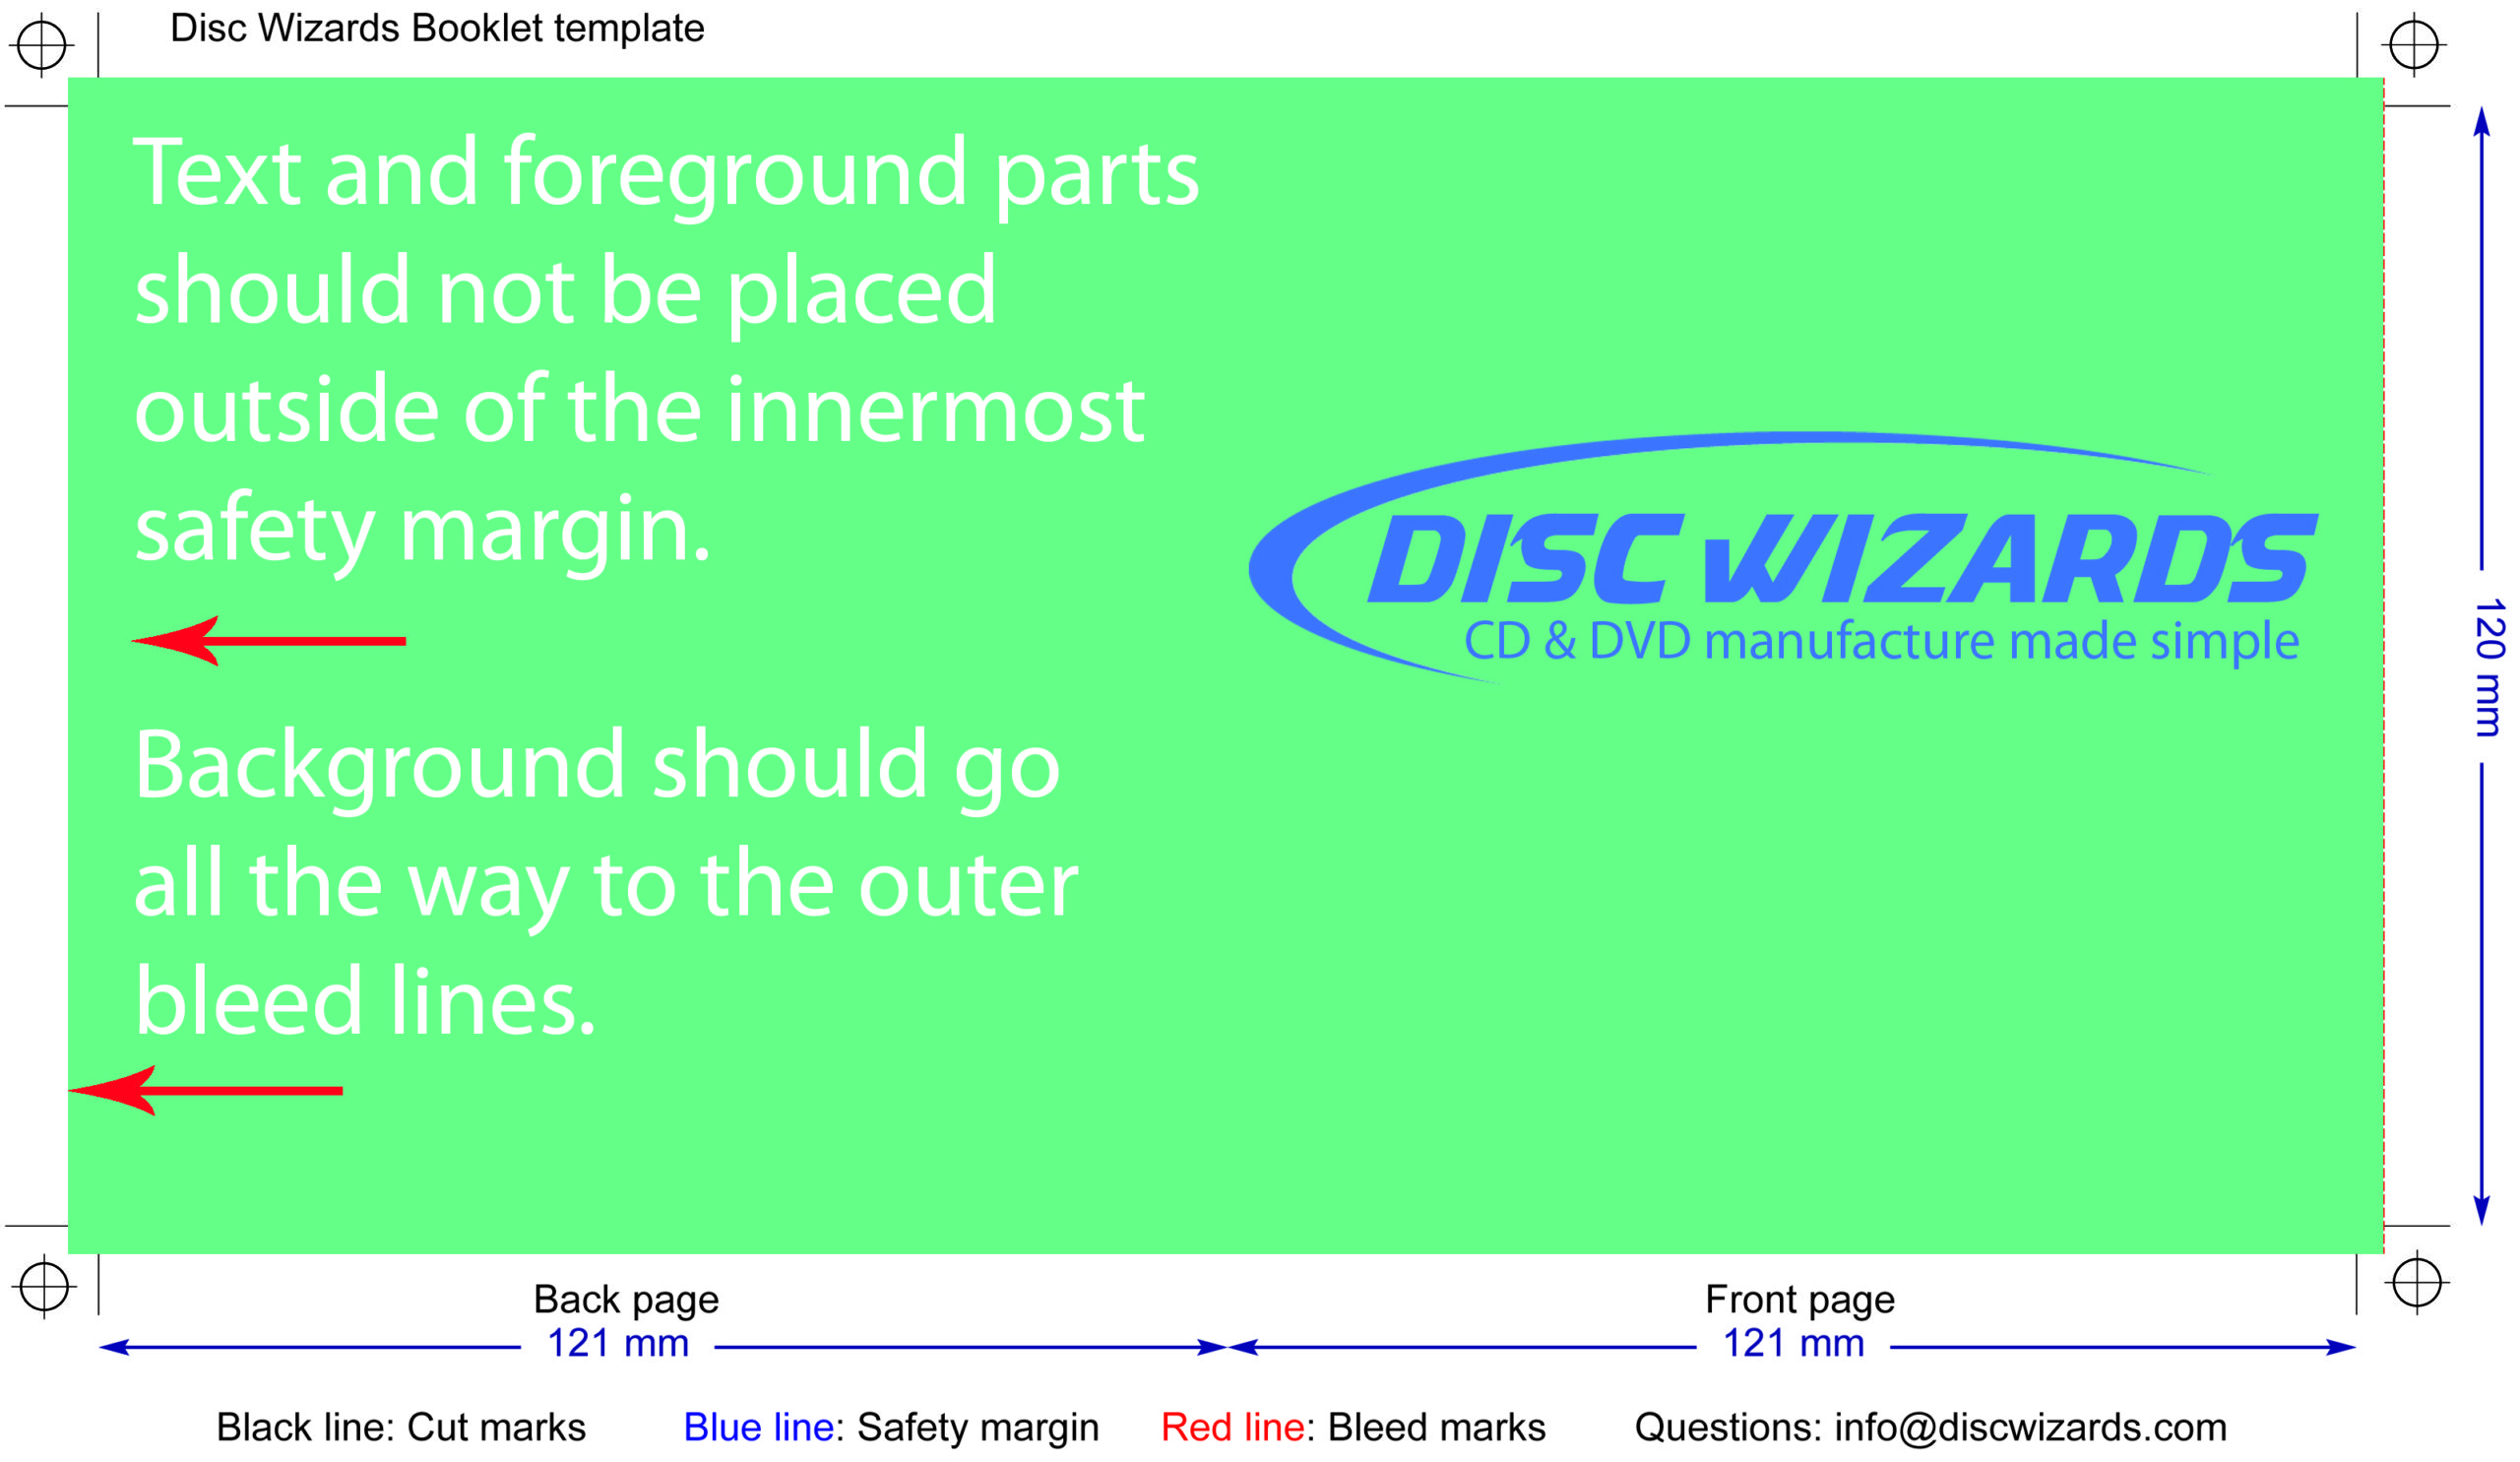
When you layout your graphics, you should make sure the background extends all the way to the outer bleed line. In the example (left), the booklet needs a green background, and this has been filled in all the way to the outside bleed line.
All the foreground parts, which includes all text, logos, foreground images etc., should be contained within the inner safety margin. This ensures text and foreground graphics are not cut off on the final print.
Layout in Photoshop showing correct placement for background and foreground elements Layers window with the template layer moved to the bottom
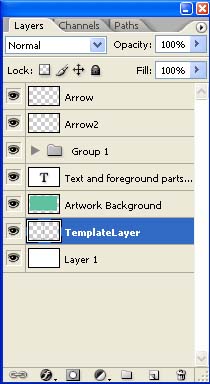
3c. Hide template guidelines
The template needs to be mostly hidden once you have completed the layout, and are happy with the way the design looks.
The only template guidelines that should be visible in the actual design area are the cross hairs which extrude beyond the design.
To do this, drag the topmost template layer to the bottom, so that all the layers of your design are now above the original template layer.
3d. Your final file
Your design should now look something like this (left), with only the cross hairs showing.
Notice that there are no guidelines in the printable area. The only parts left in the booklet design area are the elements we need printed in the final booklet.
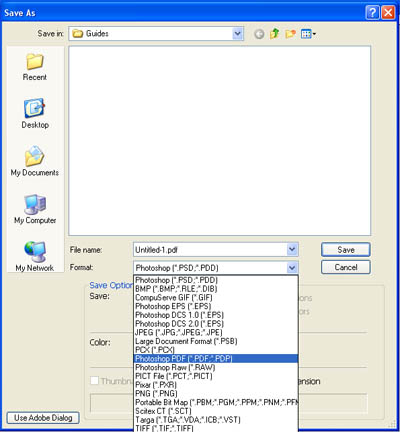
The design is now ready to be saved in the correct format Selecting PDF as the file format to save in
4a. Saving your design file
It is recommended that you save the file as a PDF. This will ensure that the fonts will remain vector and embedded in the final PDF file.
To do this go to File, then Save As, and select, Photoshop PDF from the drop down list of filetypes. The press-ready default should be selected to ensure the file is created in the right way.
If you can’t save it as a PDF, then you can also submit the file as a hi-res JPEG. For this ensure that the JPEG settings are at the highest level.
4b. Vector text
PDF files are preferred as it embeds the text as vector format. The difference between vector and JPEG can be seen in the images (right).
When the file is zoomed in, the PDF text remains sharp, whereas in the JPEG, the text pixelates which will result in slightly less sharp text on the final print.
You can download the actual files created in this tutorial from the links below, this will let you compare the outputs from the 2 files:
How to prepare your graphics for DVD and CD printing
Step by step guidelines on preparing your designs and artworks
This tutorial has been written using Adobe Photoshop. The same principles can be applied to all other design programs for preparing your artwork for submission.
The guide that follows explains how to prepare your graphics so that they are ready for going into print. The below example uses the 4 page booklet, but the same concepts can be used for any of the templates.
Choose the correct template to save from the design templates page
1. Download the correct template
From the list of templates found on the design templates page, identify and download the correct template to your computer.
You can download the template by right-clicking on the appropriate template and selecting “save target as…”, or “save link as…”.
For this example, we’ll be using the CD booklet template.
2. Open the template in Photoshop
When you open the template in Photoshop, you’ll be presented with a dialog window to set how the PDF template opens.
Use the settings shown on the left when opening any of the templates. The most important thing is to make sure the resolution is set at 300dpi, and that the colour scheme is CMYK.
Opening the PDF with the correct settings and options Layers window showing the template as the topmost layer
3a. Set your layers
Once the template is open you can begin to layout the graphics of your design.
It’s a good idea to keep the template as the topmost layer, so that you can see the outlines of the template when positioning your images and text.
3b. Layout your graphics
When you layout your graphics, you should make sure the background extends all the way to the outer bleed line. In the example (left), the booklet needs a green background, and this has been filled in all the way to the outside bleed line.
All the foreground parts, which includes all text, logos, foreground images etc., should be contained within the inner safety margin. This ensures text and foreground graphics are not cut off on the final print.
Layout in Photoshop showing correct placement for background and foreground elements Layers window with the template layer moved to the bottom
3c. Hide template guidelines
The template needs to be mostly hidden once you have completed the layout, and are happy with the way the design looks.
The only template guidelines that should be visible in the actual design area are the cross hairs which extrude beyond the design.
To do this, drag the topmost template layer to the bottom, so that all the layers of your design are now above the original template layer.
3d. Your final file
Your design should now look something like this (left), with only the cross hairs showing.
Notice that there are no guidelines in the printable area. The only parts left in the booklet design area are the elements we need printed in the final booklet.
The design is now ready to be saved in the correct format Selecting PDF as the file format to save in
4a. Saving your design file
It is recommended that you save the file as a PDF. This will ensure that the fonts will remain vector and embedded in the final PDF file.
To do this go to File, then Save As, and select, Photoshop PDF from the drop down list of filetypes. The press-ready default should be selected to ensure the file is created in the right way.
If you can’t save it as a PDF, then you can also submit the file as a hi-res JPEG. For this ensure that the JPEG settings are at the highest level.
4b. Vector text
PDF files are preferred as it embeds the text as vector format. The difference between vector and JPEG can be seen in the images (right).
When the file is zoomed in, the PDF text remains sharp, whereas in the JPEG, the text pixelates which will result in slightly less sharp text on the final print.
You can download the actual files created in this tutorial from the links below, this will let you compare the outputs from the 2 files: